

25 Types of Ear Piercings: The Complete Guide

Apart from the classic lobe and popular helix piercings, there are dozens of ear piercing styles to choose from. They include conch, daith, rook, auricle, and more, which we discuss on this page. All 25 ear piercing types mentioned here are grouped by ear area. For each, we discuss how much it hurts, how long it takes to heal, and the jewellery that works with it.
Every piercing described in this guide can be done at our studio. If you are ready for a piercing in Mississauga, ON, or have more questions, call Xtremities Tattoo and Piercing at (905) 897-3503.
Keep reading to learn all available ear piercing.
Types of Lobe Ear Piercing
The lobe is the soft lower part of the ear. It is also the easiest area to pierce. Every classic and curated ear starts here. The five variations below cover lobe piercing types, from a first piercing to bolder, less common statement placements.
1. Standard Lobe
Pain: 1-2/10
Healing: 6-8 weeks
Best jewellery: Studs or small hoops
Note: All ages; the foundation of any curated ear.
The standard lobe piercing is a straight-through hole in the soft lower lobe of the ear. It is the least painful ear piercing and the fastest to heal. This is the classic starter piercing that suits any age, from young children with a guardian to first-time adult clients. You can wear tiny studs while it settles, then switch to hoops, dangles, or larger studs once healed. The lobe is also the anchor point for building a stacked or curated ear over time.

2. Stacked (Second and Third) Lobe
Pain: 1-2/10
Healing: 6-8 weeks
Best jewellery: Small stud stacks
Note: A row of tiny studs for a layered look.
A stacked lobe piercing adds a second or third hole above your first, forming a vertical row on the soft lobe. Each hole heals on a similar timeline to a single standard lobe. Many clients start with one, then come back for a second once it feels settled. Others prefer to get all in one session so healing runs on the same clock.
The spacing between the holes shapes the final look: closer together for a clustered stack, wider apart for a spread pattern. Multiple lobe stacks are a walk-in favourite at Xtremities.

3. High Lobe
Pain: 2/10
Healing: 6-8 weeks
Best jewellery: Small studs
Note: Bridges the lobe to a helix or cartilage piercing above.
The high lobe piercing sits at the very top of the soft lobe, just before the cartilage begins. It heals like a normal lobe piercing but sits higher on the ear, giving the curated look of a cartilage piercing without the long cartilage healing time.
This placement works well as a bridge between a standard lobe and a helix piercing higher up. It also softens the visual gap between the lower ear and any upper stack you plan to build. Small studs sit best here, as the placement is still in soft tissue.
4. Transverse Lobe
Pain: 3-4/10
Healing: 8-12 weeks
Best jewellery: Curved or straight barbell
Styling note: Two visible ends give an unusual look.
A transverse lobe piercing runs horizontally across the earlobe, front to side or edge to edge. Instead of a single hole with one earring end, both ends of a barbell are visible from opposite sides of the lobe.
This placement is rare and depends heavily on lobe shape and thickness. Attached lobes usually need a curved barbell to avoid piercing at an angle that touches the jaw. Healing takes a bit longer than with a standard lobe due to the longer channel.
5. Stretched (Gauged) Lobe
Pain: Depends on stretch pace
Healing: Weeks between each size step
Best jewellery: Plugs or tunnels
Styling note: A long-term style commitment.
A stretched lobe is not a fresh piercing but a slow enlarging of a fully healed lobe hole. You start at a standard gauge, wait until the piercing is fully healed, then step up one size at a time using tapers or larger jewellery.
Each step needs weeks of settling before the next. Rushing the process can tear the tissue, leading to blowouts, uneven healing, or permanent damage. Once stretched, you can wear plugs, tunnels, and dedicated stretched-ear jewellery. You can reverse the process up to a point, but very large gauges may not fully close.

Outer Rim (Helix Family) Ear Piercings
The helix family covers the upper outer curve of the ear. This is the most versatile area for stacking multiple piercings and building a curated look. The six placements below let you mix classic and modern helix variations across one or both ears.
6. Helix
Pain: 4-5/10
Healing: 6-9 months
Best jewellery: Flat-back studs or small hoops
Note: The most popular cartilage piercing.
The helix piercing goes through the upper outer cartilage rim of the ear. It is the most common cartilage piercing and the natural first cartilage step. The piercing suits any face shape and any gender. It looks good with tiny studs, small hoops, and huggie rings once healed. Double and triple helix stacks are common in curated ear layouts.

7. Forward Helix
Pain: 5/10
Healing: 3-9 months
Best jewellery: Tiny flat-back studs
Note: Often done as a double or triple set for a stacked look.
The forward helix piercing sits on the front inner edge of the ear rim, closest to the face. It uses tiny jewellery because the space is smaller and closer to the head. Many clients get it as a matched pair or a triple, evenly spaced along the front rim. It works well beside a standard helix to build a fuller upper ear stack.
8. Mid Helix
Pain: 4-5/10
Healing: 3-9 months
Best jewellery: Flat-back studs
Styling note: Fills the space between a standard and forward helix for a triple stack.
A mid helix piercing sits between a standard helix and a forward helix, along the outer rim near the top of the ear. It is a newer placement, popularized by curated ear studios, which use it to fill the visual gap in a stacked upper-ear layout.
Healing time and pain are similar to a standard helix. The mid is often planned alongside two or three other helix piercings from the start so the spacing looks intentional. If you are building a curated ear over time, ask your piercer to sketch the whole plan first.

9. Flat
Pain: 5/10
Healing: 4-12 months
Best jewellery: Flat-back studs
Note: A statement placement for small charms or gemstones.
The flat piercing goes through the flat cartilage between the helix rim and the inner ear. This spot has room for larger or more decorative studs than the tighter helix area. Because the flat cartilage is thicker in some ears, healing can take longer than a standard helix.
Flat-back jewellery is the standard choice because it sits close to the ear and does not press on the tissue. This is a favourite spot for tiny charm-style ends. Think stars, hearts, flowers, or gemstones that catch the light.
10. Vertical Helix (Cat Flap)
Pain: 5-6/10
Healing: 6-12 months
Best jewellery: Curved barbell or flat-back labret
Note: Works for ears that will not support a standard helix.
The vertical helix piercing, sometimes called a cat flap, goes through the top of the ear from top to bottom instead of front to back. It shows both ends of the jewellery above and below the fold at the top of the helix.
This placement needs a well-defined helix rim with enough space underneath to hold the jewellery. If your ear is very flat or the rim is thin, this piercing may not be a fit. Pain is similar to a standard helix, but the exposed ends make it easier to snag on hair.
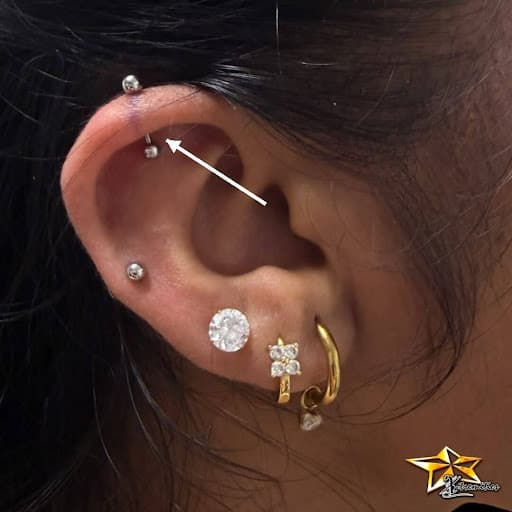
11. Auricle
Pain: 4/10
Healing: 6-12 months
Best jewellery: Hoops or studs
Note: Connects the lobe to the helix in a curated ear layout.
The auricle piercing sits on the outer rim of the middle ear, between the lobe and the classic helix. It is a subtle placement that fills the space many curated ear layouts leave empty. The cartilage here is thinner than the upper helix, so pain is lower than a full helix piercing.
Healing still takes about six to twelve months because the tissue is still cartilage. A small hoop or huggie ring looks especially clean here once healed. You can use a plain flat-back stud during the healing period.
Inner Cartilage (Conch and Daith) Ear Piercings
The conch is the deeper cup of the ear near the canal, and the daith is the small fold above it. Both work well with hoops and larger flat-back studs.
12. Inner Conch
Pain: 5-6/10
Healing: 6-12 months
Best jewellery: Flat-back stud
Note: Centre-of-ear statement piece.
The inner conch piercing goes through the centre cartilage cup of the ear, right in the middle of the concha. It is one of the most popular cartilage piercings for a bold single-stud look. Starter jewellery is a flat-back labret slightly longer than the final size to leave room for swelling. Once healed, you can switch to a hoop that wraps the outer helix.

13. Outer Conch
Pain: 5-6/10
Healing: 6-12 months
Best jewellery: Large wrap hoop
Note: Sits closer to the outer helix rim.
The outer conch piercing is placed on the flatter cartilage area between the inner conch cup and the outer helix. It heals a bit faster than the inner conch and works especially well with a large hoop that wraps the outer edge of the ear.
Because the placement sits closer to the helix, it can be planned to line up with an existing helix piercing for a symmetrical stack.
14. Vertical Conch
Pain: 6/10
Healing: 6-12 months
Best jewellery: Curved barbell
Note: Both ends of the jewellery show for a bold look.
A vertical conch piercing is a barbell that passes through the conch cartilage with both ends visible on the surface. Instead of a single stud, you see two decorative ends stacked vertically inside the ear. It is a bolder, less common look than a standard conch.
This placement requires enough conch cartilage to hold the bar without pressure, so your piercer will map the exact angle before piercing. Healing takes about the same time as a standard conch, but the exposed bar makes it easier to snag during the first few months of healing.
15. Contra Conch
Pain: 6/10
Healing: 9-18 months
Best jewellery: Flat-back stud
Note: For clients who want a rarer conch placement.
The contra conch piercing, sometimes called an outer conch or high conch, sits on the ridge just above the conch bowl and below the helix. It is thinner tissue than a standard inner conch, and healing tends to take longer, often 9 to 18 months.
Not every ear can support this piercing, so a piercer's anatomy check is essential. Flat-back studs sit best here since the ridge cannot easily hold a hoop. Once healed, the contra conch pairs beautifully with a helix stack for a curated look.
16. Daith
Pain: 5-7/10
Healing: 6-9 months
Best jewellery: Small hoop
Note: The migraine relief claim is not medically proven.
The daith piercing goes through the innermost cartilage fold, right above the ear canal. A hoop is the classic look because it sits neatly along the curve of the fold. Some people believe a daith piercing helps with migraines. There is no solid medical evidence for this, and doctors treat the reports as anecdotal or placebo.
Get a daith piercing because you like the look, not to treat a health condition. Healing is faster than a conch for most people, and downsizing is often not needed since the hoop moves gently with your ear.

Inner Ridges (Rook, Snug, Tragus)
The inner ridges are the firm cartilage folds that sit inside the ear. These placements tend to be more intense in pain and longer in healing. They also give the most striking piercings on the ear when placed well.
17. Rook
Pain: 6/10
Healing: 6-9 months
Best jewellery: Curved barbell
Note: Sits high on the inner ridge for a subtle statement.
The rook piercing passes through the inner cartilage ridge that runs vertically inside the upper ear. It is a striking placement because it shows only a small piece of jewellery inside a dramatic ridge of ear.
Not everyone has enough rook ridge to hold this piercing safely, so your piercer will confirm first. Curved barbells fit the curve of the ridge better than a hoop during healing. The rook pairs well with a daith below and a helix above for a full curated ear plan.

18. Faux Rook
Pain: 5/10
Healing: 4-8 months
Best jewellery: Flat-back stud
Note: Mimics a rook look without piercing the inner ridge.
A faux rook piercing is a stud placed on the flat cartilage right beside the rook ridge, not through it. From the front, it looks like a real rook piercing, but the piercing itself only passes through one layer of cartilage. This makes it a great option for clients whose ear ridge is not defined enough for a true rook.
Healing is a bit shorter than a real rook because only one cartilage layer needs to close. Flat-back studs sit best here since a hoop would rotate off angle.
19. Snug (Anti-Helix)
Pain: 7-8/10
Healing: 4-8 months
Best jewellery: Small curved barbell
Styling note: One of the more painful piercings
The snug piercing, also called an anti-helix, goes through the inner vertical ridge on the outer edge of the ear. It is often ranked as one of the most painful ear piercings because the ridge is dense and the piercing passes through two layers of cartilage.
Not every ear has a defined enough anti-helix ridge, and a good piercer will decline if the anatomy is not right. A very short curved barbell sits closest to the ridge during healing. Downsizing on time is important to avoid pressure bumps.
20. Tragus
Pain: 4-6/10
Healing: 6-9 months
Best jewellery: Flat-back stud or small hoop
Note: Sits over the ear canal for a subtle look.
The tragus piercing goes through the small piece of cartilage that sits over the ear canal, right in front of the ear opening. It is smaller and more delicate than a helix, but the cartilage is thick, so pain is moderate.
A flat-back stud is best during healing. Once healed, you can switch to a small hoop that wraps under the ear opening. Because the tragus sits so close to the ear canal, earbuds should be avoided during the full healing period.

21. Surface Tragus
Pain: 5/10
Healing: 3-9 months
Best jewellery: Surface barbell
Note: Higher risk of migration than a standard tragus.
A surface tragus piercing is placed on the flat skin just in front of the tragus, not through the cartilage itself. It uses a special surface barbell that lies flat under the skin. Because this is a surface piercing rather than a full cartilage piercing, the risk of migration and rejection is higher than a standard tragus.
Careful placement, quality jewellery, and gentle aftercare all help lower that risk. If your body pushes the jewellery out, the piercing may need to be removed. Ask your piercer if this piercing is a good fit for your skin.

22. Anti-Tragus
Pain: 6-7/10
Healing: 6-12 months
Best jewellery: Curved barbell or small hoop
Note: The mirror image of the tragus on the opposite ridge.
The anti-tragus piercing goes through the small cartilage ridge above the lobe, directly across from the tragus. It is a striking placement that pairs well with a tragus piercing on the same ear for a symmetrical look.
The cartilage here is dense, and pain is on the higher side of the ear-piercing scale. Because the anti-tragus is close to the lobe, sleeping on that side can slow healing more than other cartilage placements.
Connected and Statement Ear Piercings
Some ear piercings connect two or more holes with a single piece of jewellery. They take longer to plan and demand extra care during healing. These are the boldest looks on the ear.
23. Industrial
Pain: 6-8/10
Healing: 9-12 months
Best jewellery: Industrial barbell
Note: Bold statement bar across the upper ear.
The industrial piercing is two upper-cartilage piercings joined by one long straight barbell that runs across the top of the ear. It is one of the boldest looks on the ear. Not every ear has the right angle and ridge to hold the bar without pressure, so an anatomy check is essential.
Healing is longer than a single cartilage piercing because two holes and one shared bar need to settle together.

24. Orbital
Pain: 4-6/10 (varies by location)
Healing: Depends on location
Best jewellery: Single ring through both holes
Note: A hoop that passes through two connected holes.
The orbital piercing is two piercings connected by one ring instead of a straight bar. Common locations are the lobe, helix, and conch. Pain and healing time depend on where the two holes go. A lobe orbital is easier and heals in about 8 to 12 weeks, while a cartilage orbital can take 6 to 12 months.
The hoop is the whole point of the design, so both holes must be spaced to fit a specific ring size. This works well as an unusual centrepiece within a broader curated ear.
25. Constellation and Curated Ear Layouts
Pain: Depends on placements
Healing: Depends on placements
Best jewellery: Mixed studs, hoops, and small charms
Note: A planned multi-piercing design
A curated ear piercing or constellation layout is a planned arrangement of several small piercings across the ear that read as one design. Common combinations include a stacked lobe base, a small helix cluster, a flat charm, and a conch statement piece. Some layouts spread tiny piercings across the ear to look like a scattered constellation of stars.
Because you are planning multiple placements at once, spacing and jewellery choice matter more than a single new piercing. Layouts are usually built in stages, with each piercing settled before the next is added.

Bonus: Vertical Industrial
Pain: 6-8/10
Healing: 6-12 months
Best jewellery: Straight or curved barbell
Note: Goes up and down instead of across.
A vertical industrial connects two ear piercings with one barbell, but instead of across the ear, it runs up and down. It often links the helix to the conch, or two spots on the conch. Both holes are done in the same visit, so the second one can hurt more since your ear is already sore.
Not every ear shape can fit this piercing well. A skilled piercer should check first. It looks bold and works great if you already have a helix or conch piercing to build on.

At a Glance
Here is every ear piercing type ranked by pain and healing time in one place. Use it to compare placements before you book. Pain and healing are ranges that can change based on your anatomy, aftercare, and daily habits.
Type | Placement Area | Pain (/10) | Healing |
Standard Lobe | Lobe | 1-2 | 6-8 weeks |
Stacked Lobe | Lobe | 1-2 | 6-8 weeks |
High Lobe | Lobe | 2 | 6-8 weeks |
Transverse Lobe | Lobe | 3-4 | 8-12 weeks |
Stretched Lobe | Lobe | Varies | Weeks between sizes |
Helix | Outer Rim | 4-5 | 6-9 months |
Forward Helix | Outer Rim | 5 | 3-9 months |
Midi Helix | Outer Rim | 4-5 | 3-9 months |
Flat | Outer Rim | 5 | 4-12 months |
Vertical Helix | Outer Rim | 5-6 | 6-12 months |
Auricle | Outer Rim | 4 | 6-12 months |
Inner Conch | Inner Cartilage | 5-6 | 6-12 months |
Outer Conch | Inner Cartilage | 5-6 | 6-12 months |
Vertical Conch | Inner Cartilage | 6 | 6-12 months |
Contra Conch | Inner Cartilage | 6 | 9-18 months |
Daith | Inner Cartilage | 5-7 | 6-9 months |
Rook | Inner Ridge | 6 | 6-9 months |
Faux Rook | Inner Ridge | 5 | 4-8 months |
Snug | Inner Ridge | 7-8 | 4-8 months |
Tragus | Inner Ridge | 4-6 | 6-9 months |
Surface Tragus | Inner Ridge | 5 | 3-9 months |
Anti-Tragus | Inner Ridge | 6-7 | 6-12 months |
Industrial | Connected | 6-8 | 9-12 months |
Orbital | Connected | 4-6 | Varies |
Curated Ear | Multi-Placement | Varies | Varies |
Book an Ear Piercing at Xtremities
If you are in Mississauga and thinking about any of these piercings, Xtremities Tattoo and Piercing can help you plan. Our piercers use single-use needles and start you on implant-grade jewellery. We handle everything from the first lobe to a full curated ear. Our studio is available seven days a week. Walk-ins welcome.
Unsure whether to start with soft tissue or hard cartilage? Read our complete comparison of cartilage vs. lobe piercings to learn about structural and healing differences.
Book your visit or explore all our ear piercing services. Call (905) 897-3503 to plan a session. For aftercare tips that apply to any piercing above, see our piercing aftercare guide.
Frequently Asked Questions
How many ear piercings can I get in one session?
Most piercers cap it at 2 to 3 lobe piercings or 2 cartilage piercings per session. Your body has limited healing resources. Spreading multiple piercings across separate sessions usually gives better results. If you want a full ear stack, ask your piercer to plan the sessions in an order that supports each piercing's healing curve.
Do all ear piercings need to be done with a needle?
Yes, all cartilage piercings and most modern lobe piercings should be done with a single-use hollow needle, not a piercing gun. A gun forces a blunt stud through the tissue, which can crush the cartilage and slow healing. A needle passes cleanly through the tissue. At Xtremities, we use a fresh single-use needle for every piercing.
How do I plan a curated ear if I do not know where to start?
Start with a consultation. Bring reference photos of the look you like, and let a piercer check your ear first. Some placements from your inspiration may not fit your ear, and a good piercer will suggest close alternatives. Most curated ear layouts are built over 6 to 18 months, one or two piercings at a time. This gives each new piercing room to heal without competing for your body's resources.


Comments